How to Setup a Proxmox Cluster
Estimated reading time: 6 minutes

I needed a means of spinning up virtual machines to try out solutions such as Kubernetes or GitLab runners, etc, on a long-term basis. I did not want to incur the cost of running operating systems on Cloud Infrastructure. ESXi was definitely not happening, as Broadcom had muddied the waters at the time. At first, I tried Proxmox, and then I tried Suse Harvester. I contemplated XCP-ng. After weighing what I needed, I settled back to Proxmox VE.
Requirements
Here are the requirements to follow along
- At least three compute nodes
- Each with an Intel or AMD CPU
- Each with sufficient memory to run your virtual machines
- Each with a primary and data disks
- Each with network interfaces capable of 802.1Q VLANs
- Network switches capable of 802.1Q VLANs
- A thumb drive or PXE server (I highly recommend netboot.xyz) for the installer
- An ACME PKI infrastructure is optional
Initial boot
If you’re using a USB drive for the installation, head over to Proxmox VE’s download page. Write the installer to the USB drive and insert it into a USB slot on the computer/server.
This part would vary depending on the hardware being used. Here, I am using Supermicro servers. Power on your nodes, boot off the USB drive or use PXE.
-
Agree to the EULA
-
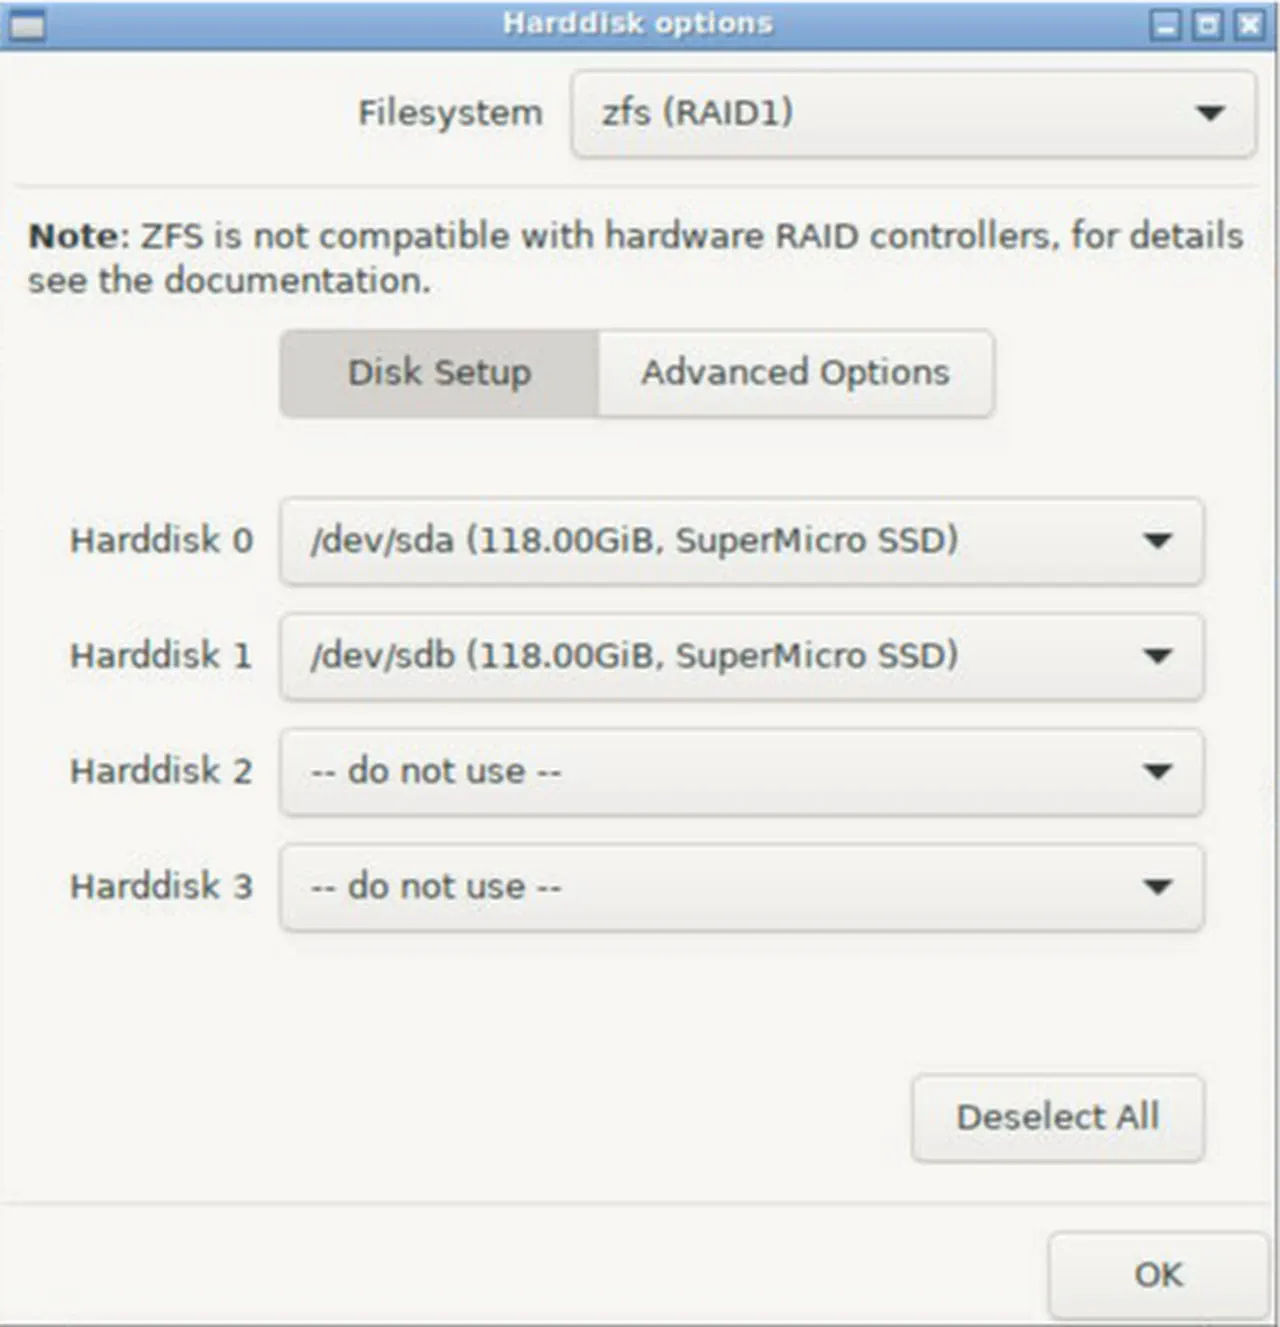
Create a ZFS Raid1 mirrored volume for the operating system and Proxmox
-
Enter your country, time zone, and keyboard layout
-
For the root account, enter a password and email address (which can be fake for now)
-
Select the management network interface and configure the hostname, IP address, gateway, and DNS server
-
Review the summary and click Install. Give the process a few minutes to complete the installation and reboot
Package management
Proxmox is a mixture of Debian and Proxmox-specific software (targeted to enterprises). However, I do not need the enterprise subscription bits in this situation, so I will modify how Proxmox gets its packages and updates. Perform the following on all nodes.
- Disable the enterprise subscriptions
sed -i'.bak' -e '1 s/^/# /' /etc/apt/sources.list.d/pve-enterprise.list
sed -i'.bak' -e '1 s/^/# /' /etc/apt/sources.list.d/ceph.list
- Add “non-free-firmware” software sources
sed -i'.bak' -e '/.debian.org/ s/$/ non-free-firmware/' /etc/apt/sources.list
- Add the “no-subscription” software repositories
tee --append /etc/apt/sources.list << EOF > /dev/null

# Proxmox VE pve-no-subscription repository provided by proxmox.com,
# NOT recommended for production use
deb http://download.proxmox.com/debian/pve bookworm pve-no-subscription
EOF

tee /etc/apt/sources.list.d/ceph.list << EOF > /dev/null

# Ceph Reef no-subscription repository
deb http://download.proxmox.com/debian/ceph-reef bookworm no-subscription
EOF
- Install updates, CPU-specific microcode, and then reboot
apt-get update
apt-get dist-upgrade -y

case $(lscpu | awk '/^Vendor ID:/{print $3}') in \
  "AuthenticAMD") apt-get install amd64-microcode -y ;; \
  "GenuineIntel") apt-get install intel-microcode -y ;; \
  esac
reboot
Networking
I choose not to use Proxmox’s SDN feature for networking. Instead, I will use VLANs to leverage my physical switching/routing infrastructure.
- On each node, back up the network configuration file
/etc/network/interfaces
cp /etc/network/interfaces /etc/network/interfaces.bak
I will write a custom network configuration file to move the management IP address to a dedicated network interface and form a bond with the 10Gb interfaces. I will also create two sub-interfaces for virtual machine migration and Ceph storage replication on the bond.
LAST_OCTET=`echo $(hostname -i) | cut -d . -f 4`

tee /etc/network/interfaces << EOF > /dev/null
auto lo
iface lo inet loopback

auto eno1
iface eno1 inet static
	address 192.168.100.${LAST_OCTET}/25
	gateway 192.168.100.1

auto eno2
iface eno2 inet manual

auto enp67s0f0
iface enp67s0f0 inet manual

auto enp67s0f1
iface enp67s0f1 inet manual

auto bond0
iface bond0 inet manual
       bond-slaves enp67s0f0 enp67s0f1
       bond-miimon 100
       bond-mode 802.3ad
       bond-xmit-hash-policy layer2+3

auto bond0.102
iface bond0.102 inet static
       address 192.168.102.${LAST_OCTET}/26

auto bond0.104
iface bond0.104 inet static
       address 192.168.104.${LAST_OCTET}/26

auto vmbr0
iface vmbr0 inet manual
       bridge-ports bond0
       bridge-stp off
       bridge-fd 0
       bridge-vlan-aware yes
       bridge-vids 2-4094

source /etc/network/interfaces.d/*
EOF
- Tell the operating system to start using the updated network configuration
ifreload --all
Time synchronization
- On each node, back up the chrony configuration file
cp /etc/chrony/chrony.conf /etc/chrony/chrony.conf.bak
- Then, write out a new configuration file that includes the primary NTP source on an internal IP address and
us.pool.ntp.orgas the backup
tee /etc/chrony/chrony.conf << EOF > /dev/null
server 172.16.2.1 prefer iburst minpoll 2 maxpoll 2 xleave
pool us.pool.ntp.org iburst
driftfile /var/lib/chrony/chrony.drift
makestep 0.1 3
rtcsync
keyfile /etc/chrony/chrony.keys
logdir /var/log/chrony
leapsectz right/UTC
EOF
- Restart the chrony service so the configuration change takes effect right away
systemctl restart chronyd
ACME Certificates
- Add the root certificate from the certificate authority server to each node and update the truststore
curl -k https://ca.lab.howto.engineer:443/roots.pem -o /usr/local/share/ca-certificates/root_ca.crt

update-ca-certificates
- On each node, register with the certificate authority server. Substitute
<email@tld>with an appropriate email address
pvenode acme account register default <email@tld> \
  --directory https://ca.lab.howto.engineer/acme/acme/directory
- Now set the domain for the acme
http-01challenge
pvenode config set --acme domains=$HOSTNAME.lab.howto.engineer
- Request a certificate for each node
pvenode acme cert order
Cluster formation
- On the first node, create a cluster
pvecm create PROXMOX-CLUSTER
- On the remaining nodes, execute the following. Enter the root password when prompted and accept adding the SSH key fingerprint
pvecm add compute-node01.lab.howto.engineer
- Review the status of the cluster
pvecm status
- Back on the first node, configure cluster-wide settings
sed -i "/console:/d" /etc/pve/datacenter.cfg
sed -i "/crs:/d" /etc/pve/datacenter.cfg
sed -i "/ha:/d" /etc/pve/datacenter.cfg
sed -i "/migration:/d" /etc/pve/datacenter.cfg

tee --append /etc/pve/datacenter.cfg << EOF > /dev/null
console: html5
crs: ha=static,ha-rebalance-on-start=1
ha: shutdown_policy=migrate
migration: insecure,network=192.168.102.0/26
EOF
- Then create an HA (High Availability) group, giving each node an equal weight
ha-manager groupadd ha-global-group \
  --nodes "compute-node01:100,compute-node02:100,compute-node03:100"
NFS Backend
I use an NFS share to store ISO and cloud-init files. The next step is to add this share to the cluster.
On the first node, validate that the NFS server exports are available to the cluster nodes. The output should list the IP addresses for each node associated with the NFS share.
pvesm nfsscan <NFS-SERVER-IP> | grep -E '192\.168\.100\.2[1-3]'
- From the first node, run the following. Substitute the values of
<NFS-SERVER-IP>and<NFS-SHARE-PATH>for the NFS server and share path details
tee /etc/pve/storage.cfg << EOF > /dev/null

nfs: artifacts
        path /mnt/pve/artifacts
        server <NFS-SERVER-IP>
        export <NFS-SHARE-PATH>
        options vers=4,soft
        content iso,snippets
EOF
Ceph storage
- On each node, install the required Ceph package. Select “y” when prompted
pveceph install --repository no-subscription --version reef
- On the first node, initialize Ceph’s configuration
pveceph init --network 192.168.104.0/26
- On each node, create a Ceph monitor and manager
pveceph mon create && pveceph mgr create
- On each node, validate which available disks will be used for Ceph object storage
lsblk
- Prepare the disks on all nodes by wiping them. This will destroy any data on the disks
ceph-volume lvm zap /dev/nvme0n1 --destroy
ceph-volume lvm zap /dev/nvme1n1 --destroy
- Designate the disks to Ceph object storage
pveceph osd create /dev/nvme0n1
pveceph osd create /dev/nvme1n1
- On the first node, create a Ceph storage pool and assign the available disks to it
pveceph pool create <pool-name> --add_storages
Wrap up
With those steps out of the way, point your web browser to https://