How to Setup Hashicorp Consul
Estimated reading time: 5 minutes

So what exactly is Hashicorp Consul? Here is what the Hashicorp has to say:
HashiCorp Consul is a service networking solution that enables teams to manage secure network connectivity between services and across on-prem and multi-cloud environments and runtimes. Consul offers service discovery, service mesh, traffic management, and automated updates to network infrastructure devices.
For the time being, I am targeting Consul’s service discovery features. In this article, I will show you how I went about this.
So, what exactly is service discovery? According to Wikipedia, it is the process of automatically detecting devices and services on a network. Some of the benefits of service discovery include:
- Dynamic IP address and port discovery
- Load balances requests to healthy service instances
- Automated service registration and de-registration
Consul’s service discovery is used alongside other solutions, such as Kubernetes or Nomad, to discover when and where said microservices run dynamically.
Take the following diagram as a simple example.
- The application registers itself with Consul with a name called “web”. Consul will create an internal DNS entry called
web.service.consul - When a client requests
web.service.consul, the load balancer will perform a DNS lookup against Consul. If configured properly, Consul will return all instances ofwebthat are online and healthy - The load balancer then forwards the request to the available instances of
web

In this diagram, one of the web instances is down for some reason. In this case, Consul will mark it as not available, and DNS queries against web.service.consul will not include the offline node in their response.
Installation
Since I have already installed Hashicorp’s Vault, I did not have to configure Ubuntu’s APT’s sources again.
- Install Consul on all nodes
sudo apt update && \
sudo apt install --yes consul
- Validate the installation. It should output the installed version of Consul
consul version
Now, I want Consul communications to be encrypted at the application level. To do so, an encryption key is required. Fortunately, Consul can generate one for you.
- From any server, capture a consul encryption key and store it in a variable
CONSUL_ENCRYPT=$(consul kengen)
- Now, let’s define a few configuration files on each server
# Node 1
sudo tee /etc/consul.d/consul.hcl << EOF > /dev/null
datacenter = "homelab"
data_dir = "/opt/consul/data"
encrypt = "${CONSUL_ENCRYPT}"
retry_join = [
  "192.168.100.11",
  "192.168.100.12"
]
EOF

sudo tee /etc/consul.d/server.hcl << EOF > /dev/null
server = true
bind_addr = "192.168.100.10"
client_addr = "127.0.0.1 192.168.100.10"
ui_config {
  enabled = true
}
log_level  = "INFO"
EOF
# Node 2
sudo tee /etc/consul.d/consul.hcl << EOF > /dev/null
datacenter = "homelab"
data_dir = "/opt/consul/data"
encrypt = "${CONSUL_ENCRYPT}"
retry_join = [
  "192.168.100.10",
  "192.168.100.12"
]
EOF

sudo tee /etc/consul.d/server.hcl << EOF > /dev/null
server = true
bind_addr = "192.168.100.11"
client_addr = "127.0.0.1 192.168.100.11"
ui_config {
  enabled = true
}
log_level  = "INFO"
EOF
# Node 2
sudo tee /etc/consul.d/consul.hcl << EOF > /dev/null
datacenter = "homelab"
data_dir = "/opt/consul/data"
encrypt = "${CONSUL_ENCRYPT}"
retry_join = [
  "192.168.100.10",
  "192.168.100.11"
]
EOF

sudo tee /etc/consul.d/server.hcl << EOF > /dev/null
server = true
bind_addr = "192.168.100.12"
client_addr = "127.0.0.1 192.168.100.12"
ui_config {
  enabled = true
}
log_level  = "INFO"
EOF
- On all servers, validate its configuration
sudo consul validate /etc/consul.d/*.hcl
- On all servers, start the consul service
sudo systemctl enable consul;
sudo systemctl start consul;
sudo systemctl status consul;
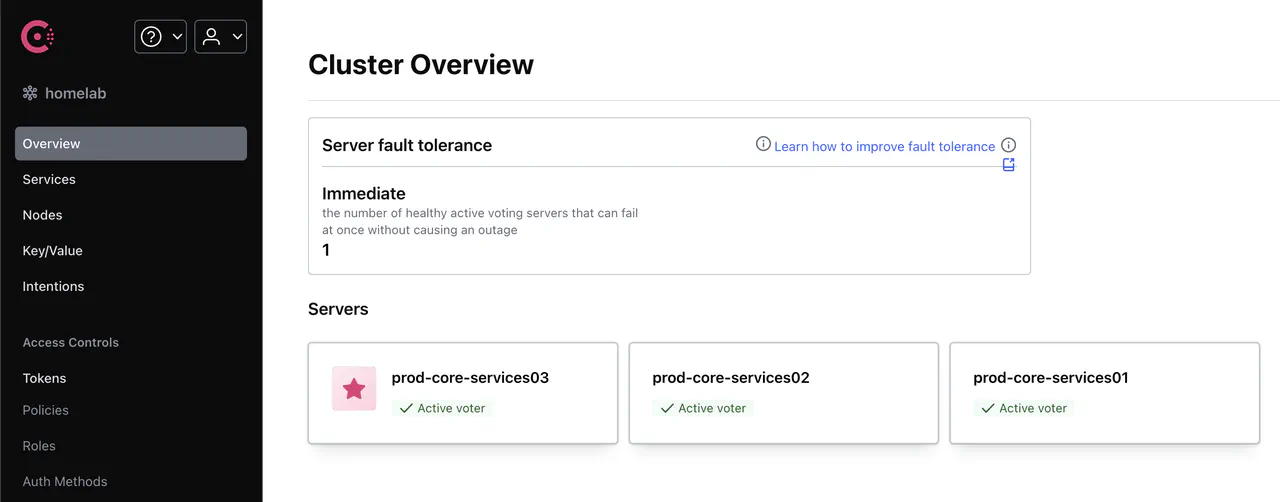
- If you did not receive any errors, point your browser to http://[node-ip]:8500
If you followed my tutorial to install Hashicorp Vault, part of the configuration included a section where Vault registers itself with Consul. If you look at /etc/vault.d/vault.hcl, you will find the following:
service_registration "consul" {
  address      = "http://127.0.0.1:8500"
}
That configuration is registering Vault in Consul.
On the left side, click on Services, and you should see something similar to this:
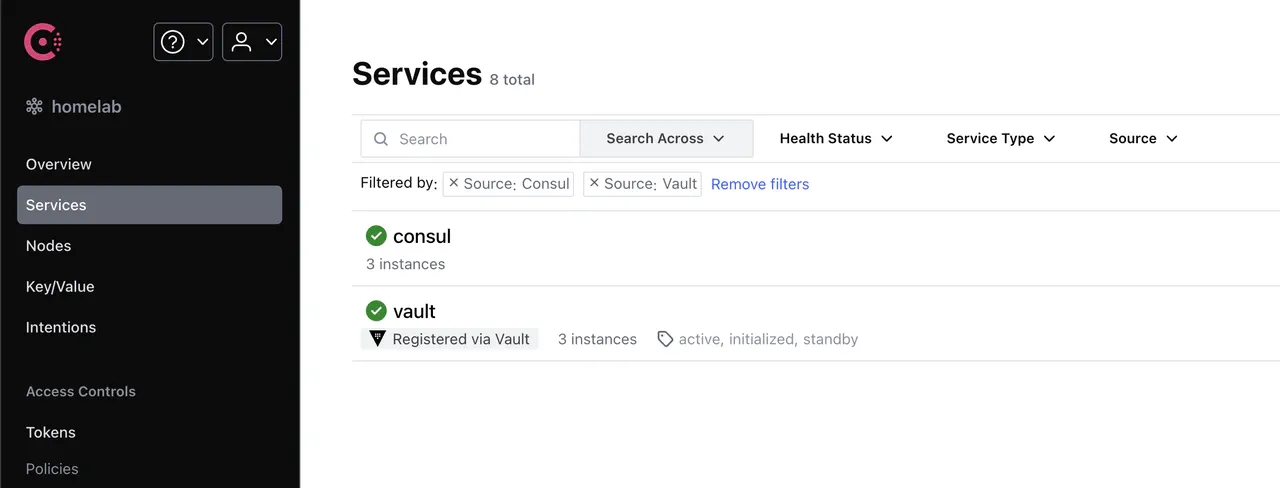
If you click into the Vault service, you will find several things that Consul is aware of:
- The Vault instances that are reporting to Consul
- The status of Vault, i.e., Initialized state or whether a node is the active or stand-by nodes
- Health check statuses
By default, Consul is the authoritative DNS service for the .consul domain. Consul’s DNS listens on a non-standard port of 8600 and responds to queries.
Take, for example:
dig @192.168.100.10 -p 8600 consul.service.consul

; <<>> DiG 9.10.6 <<>> @192.168.100.10 -p 8600 consul.service.consul
; (1 server found)
;; global options: +cmd
;; Got answer:
;; ->>HEADER<<- opcode: QUERY, status: NOERROR, id: 29631
;; flags: qr aa rd; QUERY: 1, ANSWER: 3, AUTHORITY: 0, ADDITIONAL: 1
;; WARNING: recursion requested but not available

;; OPT PSEUDOSECTION:
; EDNS: version: 0, flags:; udp: 4096
;; QUESTION SECTION:
;consul.service.consul.		IN	A

;; ANSWER SECTION:
consul.service.consul.	0	IN	A	192.168.100.11
consul.service.consul.	0	IN	A	192.168.100.12
consul.service.consul.	0	IN	A	192.168.100.10

;; Query time: 33 msec
;; SERVER: 192.168.100.10#8600(192.168.100.10)
;; WHEN: Fri Nov 29 13:26:21 EST 2024
;; MSG SIZE  rcvd: 98
Notice in the answer section that Consul responded with all instances of itself.
Depending on your DNS infrastructure, you can also have your internal DNS servers forward queries to Consul. So instead of querying *.consul, you can query against your FQDN.
dig consul.lab.howto.engineer +short
consul.service.consul.
192.168.100.12
192.168.100.10
192.168.100.11
Wrap up
In this article, I briefly introduced Consul, went through a simple installation, and touched on what its out-of-the-box service discovery could look like. In a future article on Hashicorp Nomad, I will explore how I leverage Consul’s service discovery with Nomad’s container orchestration.