Getting started with Talos Linux on Proxmox
Estimated reading time: 8 minutes
So far in my container journey, I have used stand-alone hosts with Podman and Hashicorp Nomad (again backed by Podman) for container orchestration. While these endeavors worked, they were not the most popular option for managing a containerized workload cluster. Enter Kubernetes. Some months ago, I successfully deployed RKE2 with Rancher, but the solution was not stable. For example, during host reboots, Pods may not come back in a healthy state. Recently, I learned about Talos Linux and decided to try it. This article documents my effort to set up a Talos cluster in Proxmox virtual machines.
So, what is Talos Linux? This excerpt from https://www.talos.dev/ sums it up:
Talos Linux is Linux designed for Kubernetes – secure, immutable, and minimal.
- Supports cloud platforms, bare metal, and virtualization platforms
- All system management is done via an API. No SSH, shell, or console
- Production ready: supports some of the largest Kubernetes clusters in the world
- Open source project from the team at Sidero Labs
So here are some of my goals for a Kubernetes cluster:
- Easily deployable Kubernetes clusters on-premises using virtual machines or bare-metal
- Decommission my existing Nomad cluster
- Explore using passthrough GPUs
- A solution where I can learn more about the Kubernetes way of life
Before I get started, predetermine the cluster’s virtual IP, name, and node IP addresses.
| Cluster Name | Cluster Virtual IP |
|---|---|
| dev-clus-core | 192.168.110.30 |
| Name | Type | IP Address |
|---|---|---|
| dev-clus-core-cp01 | control-plane | 192.168.110.31 |
| dev-clus-core-cp02 | control-plane | 192.168.110.32 |
| dev-clus-core-cp03 | control-plane | 192.168.110.33 |
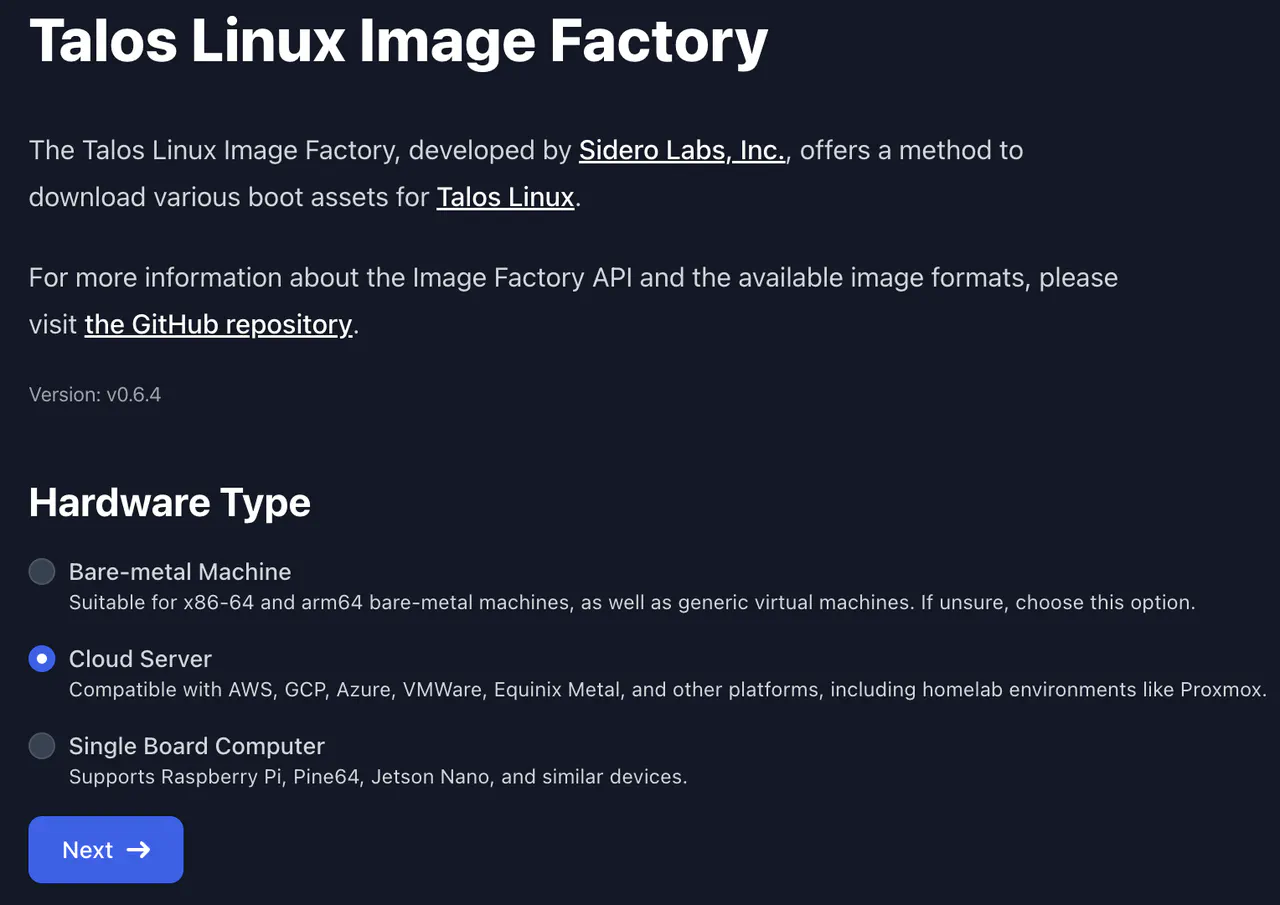
Image Factory
Talos Linux has provided a way to customize ISO and disk images to your specifications using the Image Factory. Use your browser to go there and continue.
- Choose
Cloud Serverand click Next.
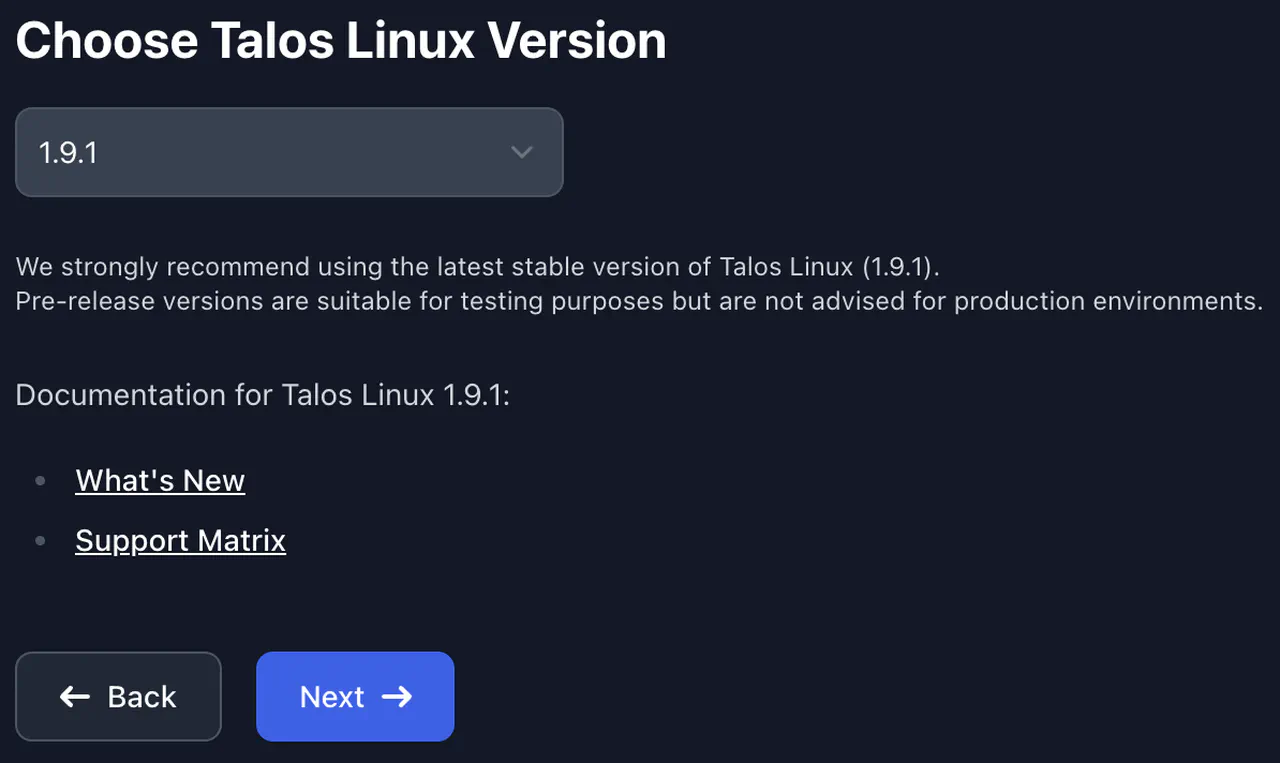
- Select the latest version and click Next
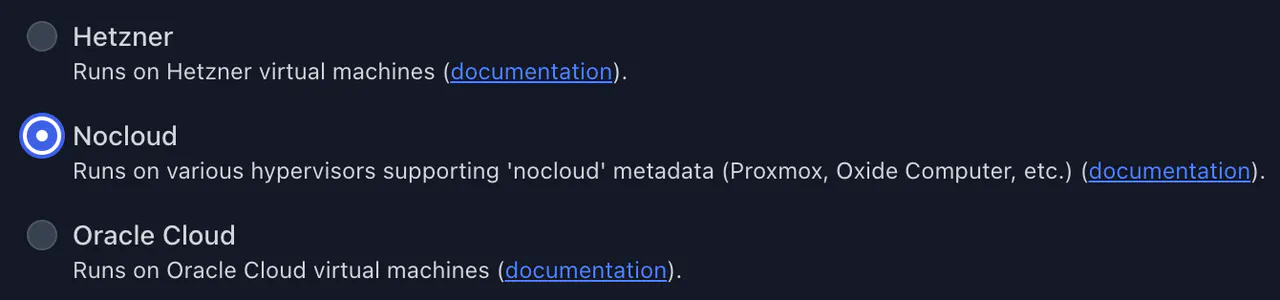
- Choose
Nocloud. This option is required so that cloud-init can be leveraged to automate parts of the setup. Click Next
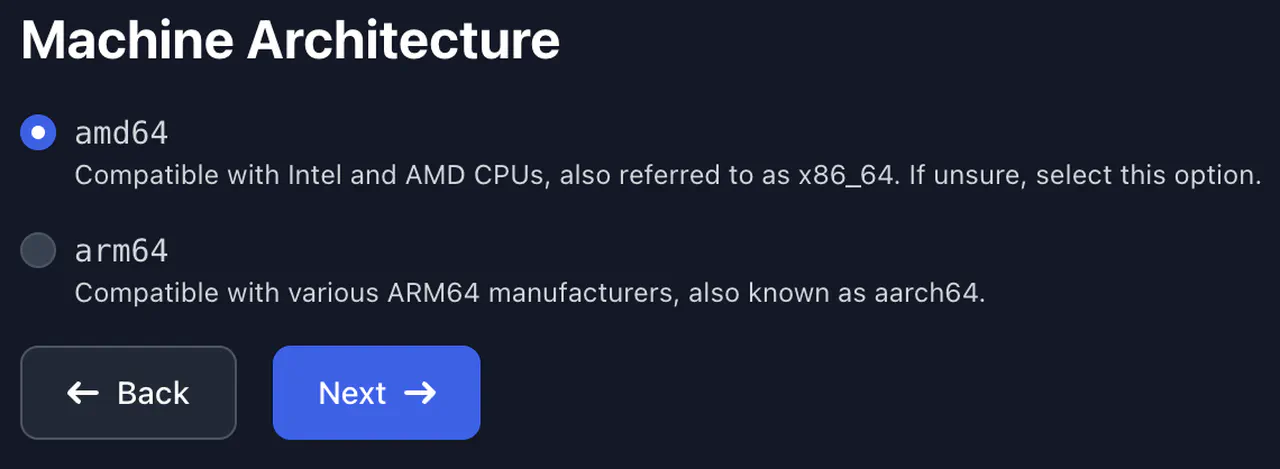
- Choose an appropriate hardware architecture (most likely amd64). Click Next
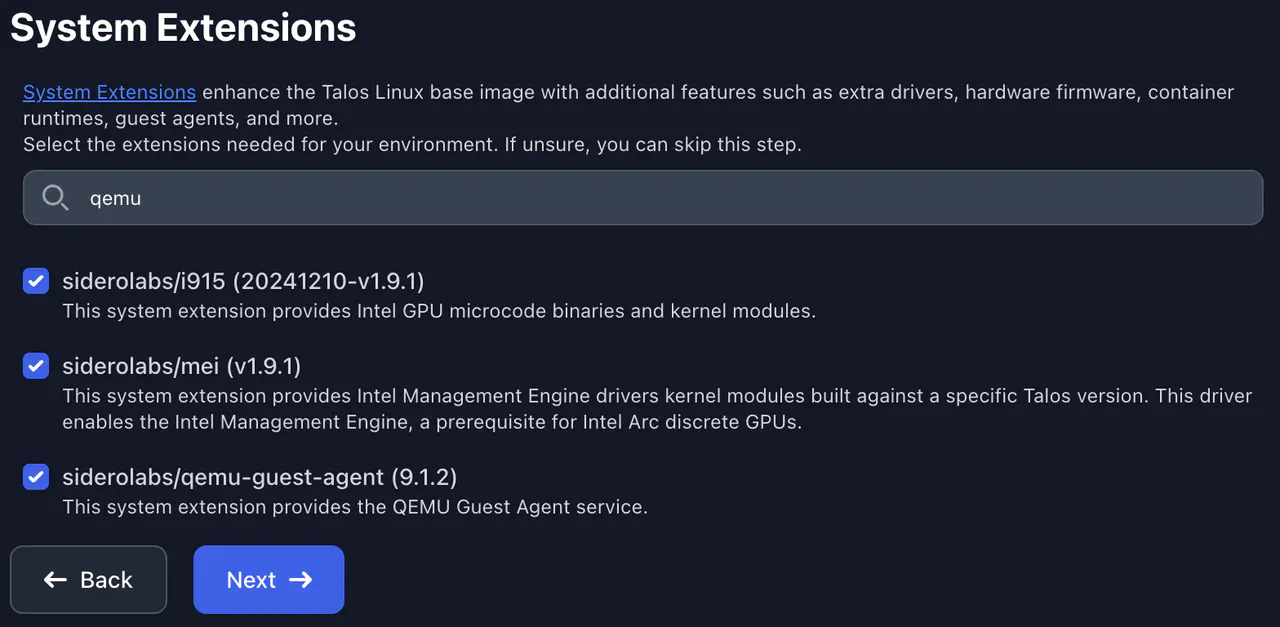
- OOn the Systems Extensions screen, I want to customize the disk image to include the necessary bits for Intel Arc GPUs (i915 and mei). I also want to include the qemu guest agent for the virtual machines. Search for Intel and qemu, select the following, and click Next:
siderolabs/i915siderolabs/meisiderolabs/qemu-guest-agent
-
Click Next
-
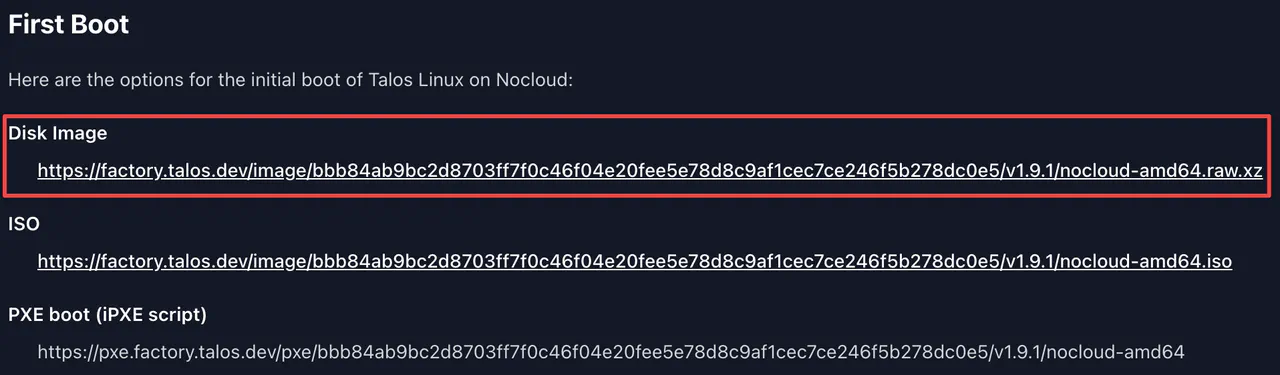
Copy the link for the Disk Image
Proxmox
In the Proxmox environment, I need to download the disk image and create a template virtual machine for easy deployment. I am deploying three virtual machines for this initial test, each with the assigned control plane and worker roles.
- SSH into one of the Proxmox nodes and change the directory to a template volume. If you have not customized this, the default location is
/var/lib/vz/template/iso
cd /<template-volume-path>/template/iso/
- Use curl to download the disk image that the Talos Factory generated
curl -fLO https://factory.talos.dev/image/bbb84ab9bc2d8703ff7f0c46f04e20fee5e78d8c9af1cec7ce246f5b278dc0e5/v1.9.1/nocloud-amd64.raw.xz
- Uncompress the downloaded file
unxz --decompress nocloud-amd64.raw.xz
- Create a virtual machine based on the image file the Image Factory generated. I also include the cloud-init “CD-Rom”.
qm create 999999997 --name talos-1.9.1-template \
  --description "Template for Talos Linux v1.9.1" \
  --sockets 1 --cores 2 --cpu host \
  --memory 2048 --balloon 0 \
  --net0 virtio,bridge=vmbr0,tag=100 \
  --ostype l26 --agent 1,fstrim_cloned_disks=1 \
  --scsihw virtio-scsi-pci --boot order=scsi0 \
  --scsi0 ssd-pool:0,import-from=/<template-volume-path>/template/iso/nocloud-amd64.raw,ssd=1 \
  --scsi1 ssd-pool:10,ssd=1 \
  --ide2 ssd-pool:cloudinit \
  --serial0 socket --vga serial0 --citype nocloud
- Convert the virtual machine to a template
qm template 999999997
- Deploy three virtual machines based off this template
qm clone 999999997 104 --full --name dev-clus-core-cp01
qm clone 999999997 105 --full --name dev-clus-core-cp02
qm clone 999999997 106 --full --name dev-clus-core-cp03
- Configure the required CPU and memory for the workloads for each virtual machine
for i in $(seq 104 106); do qm set $i --cores 4 --memory 16384; done
- Resize the disks for the workloads on each virtual machine
for i in $(seq 104 106); do qm disk resize $i scsi0 20G; done
for i in $(seq 104 106); do qm disk resize $i scsi1 50G; done
- Configure cloud-init and the network interface for each virtual machine. Here I am configuring static network settings for each virtual machine via cloud-init
qm set 104 \
  --ipconfig0 ip=192.168.110.31/25,gw=192.168.110.1 \
  --ciupgrade 0 --net0 virtio,bridge=vmbr0,tag=110 \
  --nameserver "192.168.108.11 192.168.108.10" \
  --searchdomain lab.howto.engineer

qm set 105 \
  --ipconfig0 ip=192.168.110.32/25,gw=192.168.110.1 \
  --ciupgrade 0 --net0 virtio,bridge=vmbr0,tag=110 \
  --nameserver "192.168.108.11 192.168.108.10" \
  --searchdomain lab.howto.engineer

qm set 106 \
  --ipconfig0 ip=192.168.110.33/25,gw=192.168.110.1 \
  --ciupgrade 0 --net0 virtio,bridge=vmbr0,tag=110 \
  --nameserver "192.168.108.11 192.168.108.10" \
  --searchdomain lab.howto.engineer
- [Optional] Add the nodes to an HA group. Otherwise, power them on manually
ha-manager add 104 --group ha-global-group
ha-manager add 105 --group ha-global-group
ha-manager add 106 --group ha-global-group
Talos Linux configuration
-
Create DNS records for the for the virtual IP and the nodes
-
If not already installed on MacOS, install
kubectl
VERSION="v1.32.0"
curl -LO "https://dl.k8s.io/release/${VERSION}/bin/darwin/amd64/kubectl"
chmod +x ./kubectl
sudo mv ./kubectl /usr/local/bin/
sudo chown root: /usr/local/bin/kubectl
- On MacOS, install
talosctl
brew install siderolabs/tap/talosctl
- Create a temporary directory to store configuration files
mkdir -p talos_config/setup && cd talos_config
- Create patch files to customize Talos Linux and Kubernetes
# Disable the predictable network interface names
tee ./setup/stable-network-interfaces.yaml << EOF > /dev/null
---
machine:
  install:
    extraKernelArgs:
      - net.ifnames=0
EOF
# Set the Talos virtual IP
tee ./setup/kube-api-vip.yaml << EOF > /dev/null
---
machine:
  network:
    interfaces:
    - interface: eth0
      vip:
        ip: 192.168.110.30
EOF
# Define storage
tee ./setup/storage.yaml << EOF > /dev/null
---
machine:
  install:
    disk: /dev/sda
  disks:
    - device: /dev/sdb
      partitions:
        - mountpoint: /var/local
EOF
# Define NTP sources
tee ./setup/ntp-sources.yaml << EOF > /dev/null
---
machine:
  time:
    disabled: false
    servers:
      - 172.16.2.1
      - us.pool.ntp.org
    bootTimeout: 2m0s
EOF
# Define a Metrics Server
tee ./setup/enable-metrics.yaml << EOF > /dev/null
machine:
  kubelet:
    extraArgs:
      rotate-server-certificates: true
cluster:
  extraManifests:
    - https://raw.githubusercontent.com/alex1989hu/kubelet-serving-cert-approver/main/deploy/standalone-install.yaml
    - https://github.com/kubernetes-sigs/metrics-server/releases/latest/download/components.yaml
EOF
# Allow scheduling of pods on control plane nodes
tee ./setup/pod-scheduling.yaml << EOF > /dev/null
---
cluster:
  allowSchedulingOnControlPlanes: true
EOF
# Disable kube-proxy and the default Flannel CNI
tee ./setup/disable-cni.yaml << EOF > /dev/null
---
cluster:
  network:
    cni:
      name: none
  proxy:
    disabled: true
EOF
- Generate a secrets bundle. It is an optional step if secrets must be separated from the configuration in case the configuration is in source control.
talosctl gen secrets --output-file ./secrets.yaml
- Generate a patched Talos configuration. Three files are created by
talosctl gen config:controlplane.yaml,worker.yaml, andtalosconfig. The first two will be applied to control-plane and worker nodes, respectively. In this tutorial, I only usecontrolplane.yamlas both roles are installed per node.talosconfigcontains metadata and secrets for managing a Talos Linux cluster.
talosctl gen config dev-clus-core https://192.168.110.30:6443 \
  --with-secrets ./secrets.yaml \
  --kubernetes-version "1.32.0" \
  --config-patch @setup/storage.yaml \
  --config-patch @setup/enable-metrics.yaml \
  --config-patch @setup/stable-network-interfaces.yaml \
  --config-patch @setup/pod-scheduling.yaml \
  --config-patch @setup/ntp-sources.yaml \
  --config-patch @setup/kube-api-vip.yaml \
  --config-patch @setup/disable-cni.yaml \
  --output .
- Move the Talos configuration file to its default directory if this is the first Talos cluster. To merge configurations, opt to use
talosctl config merge ./talosconfig
[ ! -d ~/.config/talos ] && mkdir -p ~/.config/talos || :
mv -i ./talosconfig ~/.config/talos/config.yaml
- Apply the patched configuration (
controlplane.yaml) to each node
talosctl apply-config \
  --file ./controlplane.yaml \
  --nodes 192.168.110.31 --insecure

talosctl apply-config \
  --file ./controlplane.yaml \
  --nodes 192.168.110.32 --insecure

talosctl apply-config \
  --file ./controlplane.yaml \
  --nodes 192.168.110.33 --insecure
- Configure the Talos configuration context with endpoints that refer to each node in the cluster
talosctl config endpoint 192.168.110.31 192.168.110.32 192.168.110.33
- Review Talos’ cluster members
talosctl get members --nodes 192.168.110.31
- Bootstrap Kubernetes
talosctl bootstrap --nodes 192.168.110.31
- Get Kubernetes’ kubeconfig from the Talos cluster and merge it to
~/.kube/config
talosctl kubeconfig --nodes 192.168.110.31
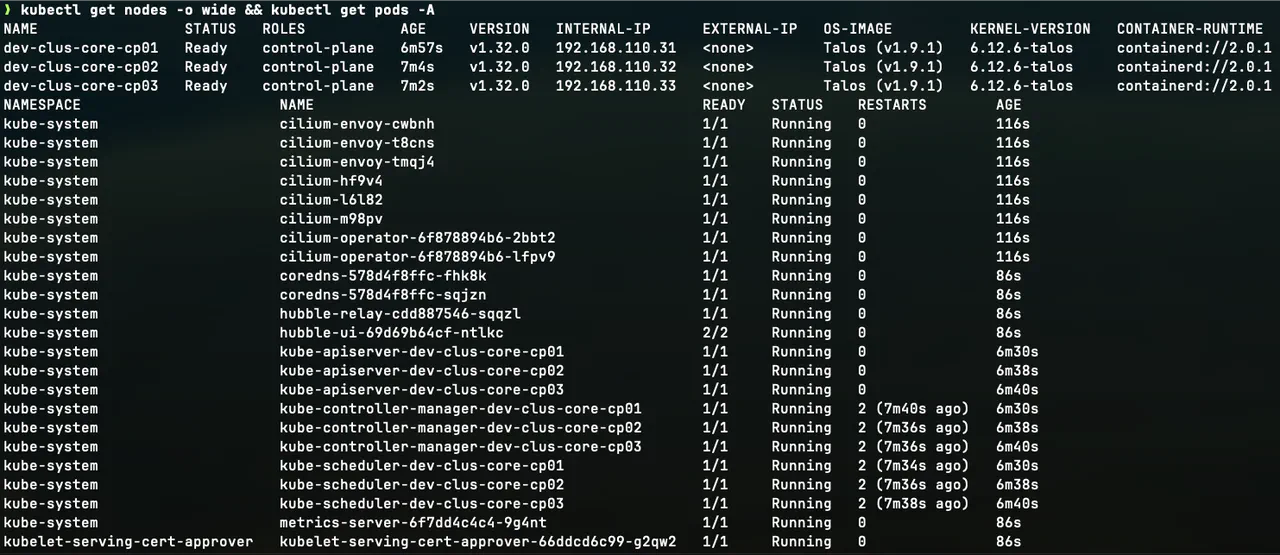
- Use kubectl to review the state of the cluster’s nodes and pods.
kubectl get nodes -o wide && \
kubectl get pods -A
- Install the Cilium CNI
helm repo add cilium https://helm.cilium.io/
helm repo update
helm install cilium cilium/cilium --version 1.16.5 \
  --namespace kube-system \
  --set ipam.mode=kubernetes \
  --set=kubeProxyReplacement=true \
  --set=securityContext.capabilities.ciliumAgent="{CHOWN,KILL,NET_ADMIN,NET_RAW,IPC_LOCK,SYS_ADMIN,SYS_RESOURCE,DAC_OVERRIDE,FOWNER,SETGID,SETUID}" \
  --set=securityContext.capabilities.cleanCiliumState="{NET_ADMIN,SYS_ADMIN,SYS_RESOURCE}" \
  --set=cgroup.autoMount.enabled=false \
  --set=cgroup.hostRoot=/sys/fs/cgroup \
  --set=k8sServiceHost=localhost \
  --set=k8sServicePort=7445
- Restart unmanaged pods
kubectl get pods --all-namespaces -o custom-columns=NAMESPACE:.metadata.namespace,NAME:.metadata.name,HOSTNETWORK:.spec.hostNetwork \
  --no-headers=true | grep '<none>' | awk '{print "-n "$1" "$2}' | xargs -L 1 kubectl delete pod
-
Give the cluster a few minutes to restart pods and get into a Running state
Reviewing Kubernetes node and pod statuses -
Take a look at Talos’ dashboard to review the state of the cluster by running:
talosctl dashboard --nodes "192.168.110.31,192.168.110.32,192.168.110.33"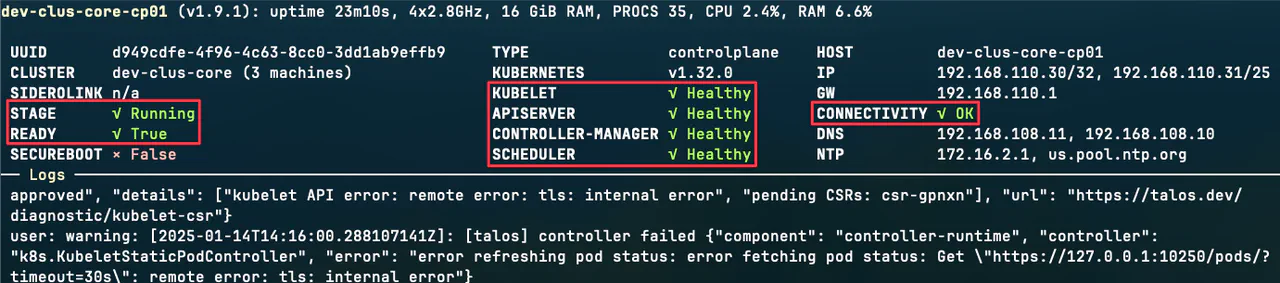
Reviewing Talos Linux's dashboard
Kubernetes deployment test
- Create a test deployment of nginx to the cluster and expose it using a NodePort service
kubectl create deployment nginx-test --image=nginx:latest
kubectl expose deployment nginx-test --type NodePort --port 80
- Get the node the pod is running on
kubectl get pod -o=custom-columns=NAME:.metadata.name,STATUS:.status.phase,NODE:.spec.nodeName -n default
- Get the port the service is available on
kubectl get service nginx-test -o=custom-columns=NAME:.metadata.name,PORT:.spec.ports[].nodePort
-
Point a web browser to the hostname:port to validate that the Pod is exposed and working
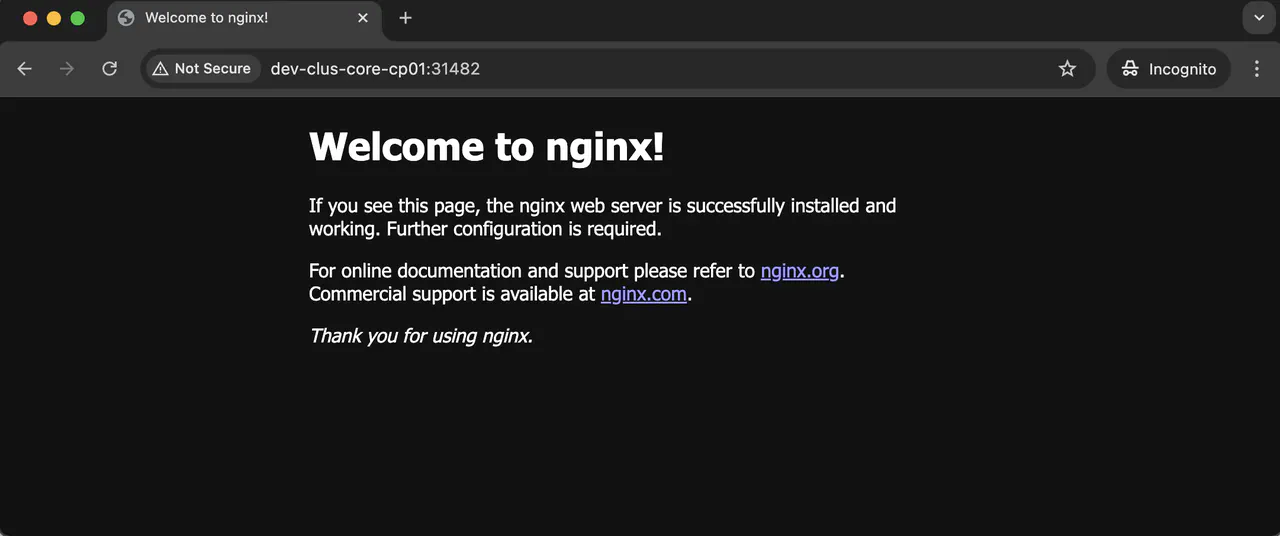
Viewing the default nginx start page -
Clean up the service and deployment
kubectl delete service/nginx-test
kubectl delete deployment/nginx-test
Conclusion
All in all, this was easy to configure and deploy for my needs. Documentation was sufficient, and the Slack community was helpful. So far, Talos Linux has been ticking the boxes. There is one improvement that I wish was there with Proxmox, though. Technically, I can include the controlplane.yaml or worker.yaml in the cloud-init configuration, but the good folks at Proxmox have not provided a clean way to modify the file via a UI or API. One must log into the shell of a node to modify the file, and at this stage of my discovery, it is easier to make edits and apply changes outside of Proxmox.
In a future article, I will take another step in my Kubernetes journey to configure Cilium to work with my existing lab network.