Google Cloud Workload Identities with GitLab
Estimated reading time: 3 minutes

Using JSON keys to authenticate with Google Cloud is highly frowned upon. Unless you have no other option, Google Cloud provides a more secure means of authenticating externally executed code. My use case is for authentication in GitLab pipelines so that I can automate tasks. Think Terraform jobs or updating the files for a website stored in a Google Cloud storage bucket. I will use Google Cloud’s Workload Identity Federation solution and the OIDC (Open ID Connect) protocol in this solution.
To get started, here are a few requirements:
- A GitLab project that will contain the pipeline code.
- A Google Cloud project with a service to grant access to. I refer to this as the service project below.
- Create a Google Cloud project specifically for Workload Identity
gcloud projects create workload-id --no-enable-cloud-apis

gcloud config set project workload-id
- Enable the required APIs for Workload Identity
gcloud services enable \
  cloudresourcemanager.googleapis.com \
  iam.googleapis.com \
  iamcredentials.googleapis.com \
  sts.googleapis.com \
  --project="workload-id"
- Define a few variables.
WIP_PROJECT_ID=$(gcloud projects describe $(gcloud config get-value core/project) --format="get(projectId)")
WIP_PROJECT_NUMBER=$(gcloud projects describe $(gcloud config get-value core/project) --format="get(projectNumber)")
GITLAB_GROUP="originaltrini0-codes"
GITLAB_PROJECT_NUMBER="64700261"
WIP_NAME="test-wip"
WIP_PROVIDER_NAME="test-wip-provider"
SERVICE_PROJECT_ID="test-compute-443418"
- Create a Workload Identity Pool
gcloud iam workload-identity-pools create $WIP_NAME \
  --location="global" \
  --display-name="Test WIP" \
  --description="Test Workload Identity Pool" \
  --project="${WIP_PROJECT_ID}"
- Create a Workload Identity Provider for GitLab
gcloud iam workload-identity-pools providers create-oidc $WIP_PROVIDER_NAME \
  --location="global" \
  --workload-identity-pool="${WIP_NAME}" \
  --description="Test Workload Identity OIDC Provider" \
  --display-name="Test Workload Identity Provider" \
  --issuer-uri="https://gitlab.com/" \
  --attribute-mapping="attribute.guest_access=assertion.guest_access,\
    attribute.planner_access=assertion.planner_access,\
    attribute.reporter_access=assertion.reporter_access,\
    attribute.developer_access=assertion.developer_access,\
    attribute.maintainer_access=assertion.maintainer_access,\
    attribute.owner_access=assertion.owner_access,\
    attribute.namespace_id=assertion.namespace_id,\
    attribute.namespace_path=assertion.namespace_path,\
    attribute.project_id=assertion.project_id,\
    attribute.project_path=assertion.project_path,\
    attribute.user_id=assertion.user_id,\
    attribute.user_login=assertion.user_login,\
    attribute.user_email=assertion.user_email,\
    attribute.user_access_level=assertion.user_access_level,\
    google.subject=assertion.sub" \
  --attribute-condition="assertion.namespace_id==\"${GITLAB_GROUP}\"" \
  --project="${WIP_PROJECT_ID}"
- Create a service account for impersonation in the service project
gcloud iam service-accounts create test-svc-acct \
  --display-name="Test Service Account" \
  --project="${SERVICE_PROJECT_ID}"
- Create a storage bucket in the service project and upload test files to it
gcloud storage buckets create gs://gms-bucket-2024 \
  --project="${SERVICE_PROJECT_ID}"

gcloud storage cp ~/Downloads/*.jpg gs://gms-bucket-2024
- Get the service project’s service account email address and grant it the Workload Identity User role
SERVICE_ACCOUNT_EMAIL=$(gcloud iam service-accounts list --project="${SERVICE_PROJECT_ID}" --filter="email~test-svc-acct" --format="get(email)")

gcloud iam service-accounts add-iam-policy-binding $SERVICE_ACCOUNT_EMAIL \
  --role=roles/iam.workloadIdentityUser \
  --member="principalSet://iam.googleapis.com/projects/${WIP_PROJECT_NUMBER}/locations/global/workloadIdentityPools/${WIP_NAME}/attribute.project_id/${GITLAB_PROJECT_NUMBER}" \
  --project="${SERVICE_PROJECT_ID}"
- Grant the service account the
roles/storage.objectAdminrole to the storage bucket
gcloud storage buckets add-iam-policy-binding gs://gms-bucket-2024 \
  --member=serviceAccount:$SERVICE_ACCOUNT_EMAIL \
  --role=roles/storage.objectAdmin \
  --project="${SERVICE_PROJECT_ID}"
- In your GitLab project, commit a
.gitlab-ci.ymlfile with the following content
stages:
  - auth

auth:
  variables:
    GOOGLE_CLOUD_PROJECT: test-compute-443418
    GOOGLE_SERVICE_ACCOUNT_EMAIL: [email protected]
    GOOGLE_WORKLOAD_IDENTITY_PROVIDER: projects/722905479622/locations/global/workloadIdentityPools/test-wip/providers/test-wip-provider
  image: docker.io/google/cloud-sdk:slim
  id_tokens:
    GITLAB_OIDC_TOKEN:
      aud: https://iam.googleapis.com/projects/722905479622/locations/global/workloadIdentityPools/test-wip/providers/test-wip-provider
  script:
    - mkdir -p _google_auth
    - echo "${GITLAB_OIDC_TOKEN}" > $CI_PROJECT_DIR/_google_auth/.ci_job_jwt_file
    - gcloud iam workload-identity-pools create-cred-config ${GOOGLE_WORKLOAD_IDENTITY_PROVIDER}
      --service-account="${GOOGLE_SERVICE_ACCOUNT_EMAIL}"
      --service-account-token-lifetime-seconds=600
      --output-file=$CI_PROJECT_DIR/_google_auth/.gcp_temp_cred.json
      --credential-source-file=$CI_PROJECT_DIR/_google_auth/.ci_job_jwt_file
    - gcloud config set project test-compute-443418
    - gcloud auth login --cred-file=$CI_PROJECT_DIR/_google_auth/.gcp_temp_cred.json
    - gcloud storage ls gs://gms-bucket-2024
  stage: auth
  when: manual
-
Manually trigger the job
-
Review the job’s progress. The results show that the GitLab runner can authenticate and list the files in the storage bucket
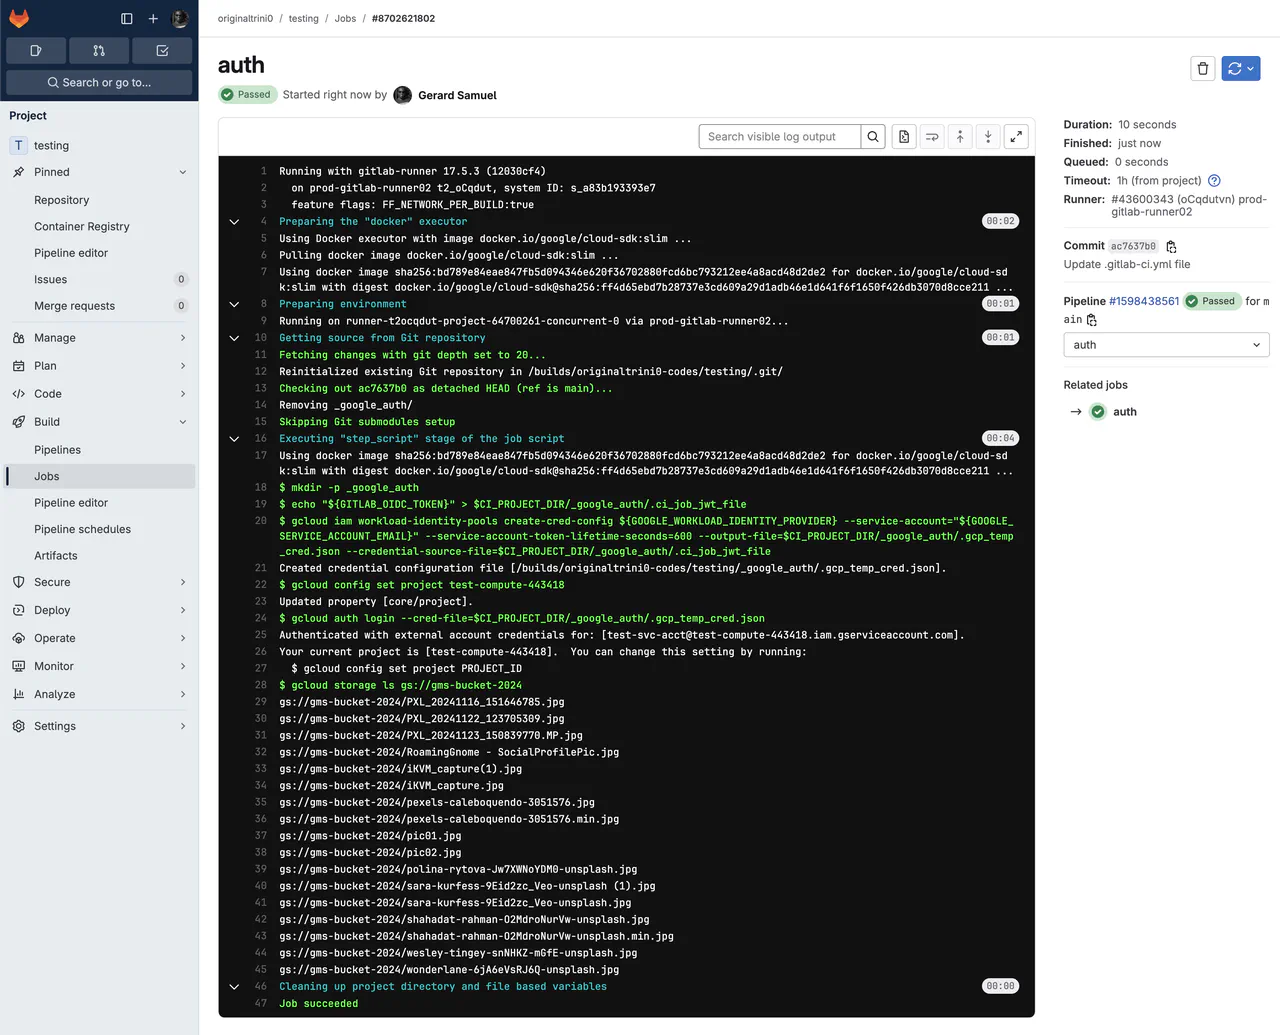
Gitlab pipeline results -
Go to Logs Explorer for the service project, and run the following query
protoPayload.methodName="GenerateAccessToken" AND
protoPayload.authorizationInfo.granted="true"
- You should find the corresponding log entry similar to this screenshot where the GitLab runner authenticates to Google Cloud
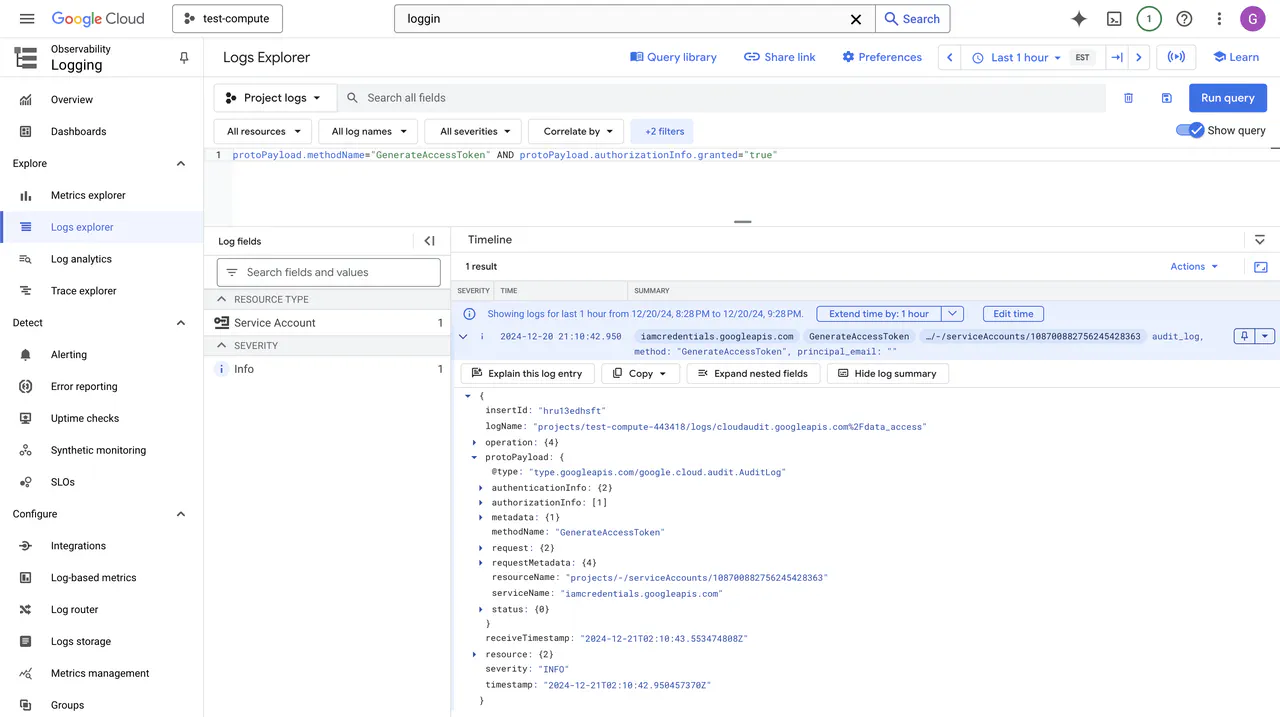
Authentication logs in Google Cloud Logging
Conclusion
In this article, I demonstrate how to enable and configure a Workload Identity Pool and Provider that uses GitLab’s assertion data to grant access to Google Cloud. For more information about Workload Identity Federation, visit the documentation page.